Home made Christmas Boxes filled with goodies
This has probably been the biggest week of the year for me with our senior school pantomime, Community Board meeting, swim club final night and celebration and Cromwell College sports celebration, I haven't really manged any time at home. Today I decided to completely ignore the housework and needs of my family and I threw myself into making special Christmas gifts for my colleagues at work. Last year I managed to find beautiful Christmas tins through one of the regular stationery suppliers we use at school - no such luck this year - so I had to make my own Christmas boxes. These boxes are the same as the little jewelry boxes made from old Christmas cards. I am not rich enough to buy my amazing team jewelry - they have to make do with sweet treats made with love and appreciation. These boxes are made from old manila folders, I seem to have loads of these with labels and writing on both sides and names of children who left our school years ago. Any light card can be used i.e. cereal boxes, beer boxes.
The boxes are really easy to make and look amazing - I would be very happy to receive one as a gift with home made goodies inside. Step by step instructions follow.
I used old manila folders. The first job is to make a square on your cardboard. Remember you will need a lid and a base - I used a folder for each so that I could make the boxes big enough to hold plenty of sweet treats. With the folders I found that a 32.5cm square fitted in all the different styles of old folder I had available. I made squares of this size for the box lids and made the box bases 1cm smaller i.e. a 31.5cm square. Other than the slight size difference the base and lid are exactly the same.


 |
| Gorgeous Christmas boxes - filled and tied with ribbons |
I used old manila folders. The first job is to make a square on your cardboard. Remember you will need a lid and a base - I used a folder for each so that I could make the boxes big enough to hold plenty of sweet treats. With the folders I found that a 32.5cm square fitted in all the different styles of old folder I had available. I made squares of this size for the box lids and made the box bases 1cm smaller i.e. a 31.5cm square. Other than the slight size difference the base and lid are exactly the same.

- Find the centre of the square using a ruler or straight edge from corner to corner - make a cross to mark the centre.
- Cut a piece of Christmas wrapping paper slightly bigger than the card square - use a glue stick to cover the paper and stick it onto the card - on the other side to the cross (choose the side with the least writing and marks as they can show through the wrapping paper)
- Trim the paper to the same size as the card.


- Fold all the corners into the centre of the card. Use a ruler to make sure the folds are sharp.


- Fold parallel sides into the centre - run a ruler over the folds to make sure they are sharp
- Open the folds and then do the other parallel sides to the centre


- Open two parallel corners right up and lay flat
- Cut from the base of the triangle made by the fold on both sides - make the cut right up to the edge of the wrapping paper triangle as shown in the picture


- Pick up the flaps made by the cuts and stand them up to make a box shape as shown in the top picture
- Fold the arrow shaped piece over and into the centre as shown in the middle picture
- Repeat on the other side as shown in the bottom picture - I add some glue to make it secure, but it should hold in this shape without glue
Make the box base in exactly the same way - remembering that it needs to be a square with sides that are 1cm shorter than for the box lid.


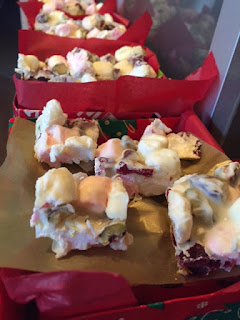
I sealed the boxes with modge podge and left to dry before placing tissue paper in the base and filling with rocky road made with white chocolate, dried cranberries, pistachio nuts and marshmallow.


Top with a final piece of tissue paper before placing the lid on the box. Finish with curling ribbon to make them look really special.


Comments
Post a Comment